Animations and Transformations in p5.js
Objectives and Overview
Lesson Objectives
Animations and Transformations
Let’s examine some additional tools for unlocking your creativity: animations and transformations. Remember, by default the draw() function refreshes at 60 frames per second (60 fps). Any code placed inside the draw loop will run 60 times in the duration of one second. This allows for some incredibly fast animations and transformations!
This lesson will introduce a basic command: translate(). The following lessons cover other transformations such as rotate(), push(), pop(), and scale().
Basic Animations
You may have already started experimenting with animations in your loop code. This is one way to create animations, but there are also several tools that extend on this concept. Let’s take a quick look at a basic motion code that is placed directly in the draw function:
[ code snippet draw() animation ]
Transformations
Transformations change the way your sketch interacts with the canvas coordinate system. Up until this point in the course you’ve been using the default coordinate system with the origin (0, 0) being in the upper left corner. Transformations allow you to change the origin and therefore change the behavior of your sketch. The first transformation that you’re going to work with is translate(). Understanding how to use this command will unlock several more powerful transformations that you can use for programming motion graphics.
Translate
Translate shifts the origin from the top left corner (0, 0) to a point of your choice. This is somewhat tricky at first but opens up several options that let you move away from always using a locked origin in the upper left corner of the canvas. Let’s take a look at an example!
First, let’s look at a sketch that uses the default origin of (0, 0). Paste this code into the web editor and preview it:
function setup() {
createCanvas(400, 400);
}
function draw() {
background(0);
fill(255, 0, 100);
rect(50, 50, 100, 50); //50 at x-axis, 50 at y-axis relative to origin (0, 0)
}Code language: JavaScript (javascript)This results in the following sketch:
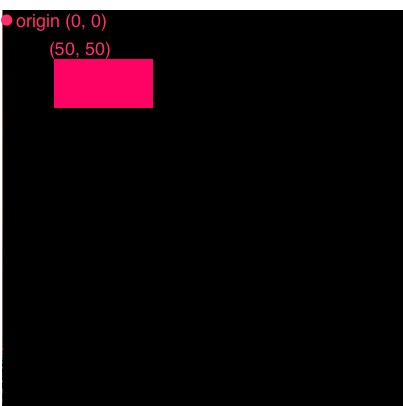
The rectangle is created at point (50, 50), which is 50 pixels from the origin in both the X and Y axes.
Now, let’s add a bit more code to sketch. This time, translate() will be used to shift the origin to (150, 150):
function setup() {
    createCanvas(400, 400);
}

function draw() {
    background(0);
    fill(255, 0, 100);
    rect(50, 50, 100, 50); //50 at x-axis, 50 at y-axis relative to origin (0, 0)

    translate(150, 150); //translate shifts the origin to (150, 150)
    fill(0, 100, 255);
    rect(0, 0, 100, 50); // drawn at the new origin, which is (150, 150)
}Code language: JavaScript (javascript)
This code retains the original pink triangle but also draws a blue one after shifting the origin to (150, 150). The origin is now moved to 150 on the x and y axes.
Note: translate() only effects the code that comes after it!
In this example, now that the origin has shifted to (150, 150), the second rectangle is drawn at (0, 0) which is actually (150, 150) on the coordinate plane!

Essentially, translate() shifts the origin from (0, 0) to the values passed in the parameters. In this example below, the origin has shifted +100 on the x-axis and +100 on the y-axis:

However, one thing that you need to remember is that the new origin, which is (100, 100) compared to the default (0, 0), is now actually (0, 0)! In your code, if you refer to (0, 0) after calling translate(100, 100) the (0, 0) will refer to the new origin.
Go ahead and experiment with this in your sketches! One thing to note is that your sketch can have multiple translations in the same draw function!
Translate: Key Points
Point One: Translate behaves similarly to fill()! Remember that if you call fill() somewhere in your sketch, everything drawn afterward will use that color until fill is changed. Translate behaves the same way. Every shape that comes after translate() uses the new origin until you enter a new translation.
Consider the following example:
function draw() {
    background(0);
    fill(255, 0, 100);
    translate(100, 100);
    ellipse(0, 0, 30, 30);
    fill(0, 100, 255);
    ellipse(100, 100, 30, 30);
}Code language: JavaScript (javascript)
Here is a screenshot produced from the above code:

The blue ellipse is now drawn at (200, 200) because it uses the translated (100, 100) as the origin. The x and y values of the ellipse are offset from the new, translated origin of (100, 100). This continues for any shapes drawn after translate() is called. You can think of the x and y parameters for rect() and ellipse() as being origin x + x value, and origin y + y value.
Test this out for yourself!
Point Two: Remember, the draw() function refreshes/loops at a default rate of 60 frames per second.
Challenge: How do you think you could create a sketch that translates around the location of your mouse?