Working With p5.js: The Basics
Overview and Objectives
This lesson introduces the basic structure of p5.js and how it interacts with the HTML canvas element. One of the core objectives is for learners to recognize how the HTML canvas coordinate plane differs from what they’ve used in Scratch. The other main purpose of this lesson is to build a basic familiarity with the p5 editor interface through creating some basic sketches. This lesson should be a balance between direct instruction and active practice.
Lesson Objectives
- Understand the basic structure of p5.js
- Demonstrate that you can navigate the p5.js web editor interface
- Demonstrate an understanding of the coordinate plane and how it differs from Scratch
Facilitator Notes
Youth should begin exploring p5.js as soon as possible. This lesson covers a lot of the basic concepts (at least enough for them to get started). Try to achieve a balance between direct instruction and allowing the youth time to explore. One benefit of using the p5.js web editor instead of a stand-alone code editor is that the youth are able to get started with minimal barriers to entry. Make sure that the youth have a solid starting point before allowing them to dive in.
The walkthrough videos are a solid, and fun introduction. Consider watching these as a group and encouraging the youth to start ‘drawing’ on the canvas. In order to facilitate this process, some quick direct instruction about basic concepts such as color, shapes, and lines may be necessary.
Make sure that the youth understand that the setup() function runs once when the sketch code first executes and that the draw() function loops at 60 frames per second (by default). Any code inside draw will continually loop while the sketch is running. This looping feature is how p5 creates motion graphics, animations, and games.
Working With p5.js
One of the strengths of p5 is that it’s highly accessible. For the majority of the course, you’ll be working with the p5.js web editor. This is a great method to build your confidence with p5 and JavaScript without needing to worry about configuring a development environment. Once you become more comfortable with p5 you can always use a text editor such as Atom or VSCode, but for this course, it’s recommended to use the online editor since much of the configuration is built-in.
As you write your code you’ll be able to easily run a browser preview through the editor. This will build the great habit of checking your code in real-time, as you can immediately see the result of your code.
Interacting With the Canvas Element
P5 interacts with the HTML5 canvas element. P5 handles a lot of this interaction behind the scenes, but essentially what’s happening is that you’re writing JavaScript code that draws on the HTML5 canvas element. You can think a webpage as a frame for a blank canvas. The canvas element is similar to the stage in Scratch, except that you’re able to control the canvas size with code.
Let’s walk through some introductory code snippets to get up and running. It’s alright if you don’t completely understand everything quite yet – p5 has a lot of built-in functions and methods that you’ll be using throughout the course. Focus on developing a familiarity with the structure and foundations of the code. The rest will come with time!
Activity: Your First Sketch
Open up the p5 web editor and take a look at the interface. You should have made an account in the previous lesson. If you haven’t, take the time now to set one up.
There are a few things that are crucial to understanding before writing any code.
The bulk of the application interface is the code editor. There is a default tab named sketch.js. If you’ve done any Arduino programming you may recognize the terminology of sketch. p5 refers to all your JavaScript programs as sketches. By default, the name for any initial file is sketch.js. This is where you’ll be writing all your JavaScript code.
There are other important parts of the editor too, such as the displayed project name and the play button. Clicking the play button will open a web browser window and run your code! This is a great way to actively preview your program.
Let’s take a look at the code that’s inside the sketch.js file:
There are two functions in this sketch: setup() and draw(). These will be present in every single program that you write in p5.
function setup() runs only once when the sketch is first opened in the browser.
function draw() repeats while the browser window is open. The code inside draw() repeats with a FPS (frames per second) rate of 60. The bulk of your code is in draw().
Exploring the setup() Function
Go ahead and enter the following code into your browser:
function setup() {
createCanvas(640,480);
background(255,0,100);
}
function draw() {
}Code language: JavaScript (javascript)For now, go ahead and leave the draw() function empty. Once you’ve entered this code, click Run and watch what happens in the preview window.
createCanvas() takes two parameters (values). The first is the width of the canvas and the second is the height. For example, createCanvas(640, 480); makes an HTML canvas that is 640 pixels wide and 480 pixels tall. Notice that this canvas only takes up a portion of the browser window.
background() takes several different values, but in this case, a RGB color value changed the canvas background color. Experiment with different values to see the canvas color change!
Note: Make sure to include a semi-colon at the end of every line of code! While not strictly necessary, this is still considered a JavaScript best practice by many thought-leaders in the industry.
Exploring the draw() Function
The Hello World (introductory first project) for p5 is to draw an ellipse on the canvas. You’ve already created your canvas and given it a background color. Now it’s time to draw an ellipse!
Go ahead and write the following code in function draw():
function draw() {
  ellipse(100,100, 50,50);
}Code language: JavaScript (javascript)
ellipse() takes four parameters: x origin, y origin, height, and width. Remember that (0,0) is the top left corner of the canvas. This example moves the origin 100 pixels to the right and then 100 pixels down so that the center of the ellipse is the point (100,100). The ellipse is drawn with a height and width of 50 pixels each. Experiment with changing some of these parameters and see what happens when you re-run your code.
More Color
You’ve already changed the canvas background color with background(), but what if you wanted to change the color of the shapes that are drawn on the canvas? P5 has a method for this called fill().
Revisit your previous sketch and add the following before the ellipse() code:
fill(0,0,0);
Before running the sketch, try to predict what will happen.
Here’s the full code from the sketch:
function setup() {
  createCanvas(640,480);
  background(255,0,100);
}

function draw() {
  fill(0,0,0);
  ellipse(100,100, 50,50);
}Code language: JavaScript (javascript)
One of the best ways to practice is to explore. Go ahead and alter some of the parameters for the ellipse() and the fill().
Next, go ahead and move the fill() code to after the ellipse() and see what happens!
The Canvas Coordinate Plane
The canvas coordinate plane is different than the one in Scratch. The origin (0,0) is in the top left corner of the canvas.
In math class and in Scratch, you mapped points and lines based on the Cartesian coordinate system which places the center point (0,0) directly in the center of the graph. p5 incorporates the same coordinate system, with one major difference. Instead of 0,0 starting from the exact center of the graph, it is instead placed in the upper left corner of the graph. See the images below for reference:

So if you wanted to draw the point (4,5) on the grid it would look like this:

Activity: Lines and Shapes
The interaction between draw() and the canvas is the core of p5. Before moving to the next lesson, let’s get some more practice working with drawing on the canvas element.
You’ve already drawn an ellipse. Now let’s draw a line. Instead of a single x and y pair like the ellipse, a line requires two sets of points in order to draw a line between them. Take a look at this image:
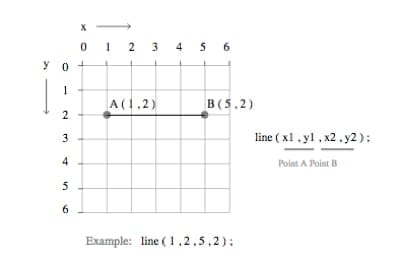
In this example, a line is being drawn from point A which originates at x-position 1, y-position 2, and terminates at point B which lies on x-position 5, y-position 2. Here is an example of how to draw this line in p5:
line(1,2,5,2);
Go ahead and draw some lines and shapes on a sheet of graph paper and then draw them in p5.