Fusion 360: Dice Project
Objectives and Overview
In this lesson, we will be designing a six-sided die in Fusion 360. This project will give you a basic understanding of using some of the functions of the Sketch tools and Create tools within Fusion 360. This tutorial will walk you through creating the six-sided face of a die and using that knowledge, we want you to make remaining faces of the six-sided die.
Lesson Objectives
- Learn basic concepts of using the Sketch Tools
- Learn basic concepts of using the Create Tools
Step-By-Step: Creating The Six Side of a Die
Step 1
Open up Fusion 360 and let’s start by creating a new sketch. Create⇩ > Create Sketch Choose the XZ Plane to start a sketch on.
Step 2
Next, create a 2-Point Rectangle by using the keyboard shortcut ‘R’. You want to make a square so make sure the length and width are the same measurement. Let’s make a 30mm square. As you hold left-click drag outward, a text box with the dimensions of the length and width will highlight blue; Type 30 and click ‘Tab’ to lock the measurement in each box. Click Enter.

Step 3
Click the ESC key or Finish Sketch in the top right corner to complete the sketch. Next, you’re going to add depth to our square by extruding the sketch. Create⇩ > Extrude (or use keyboard shortcut E) > Select the Sketch (it’ll highlight blue) > Extrude 30mm
Step 4
Now you’re going to start sketching the pips for the six-sided face of the die. Create a new sketch on top of one side of the square. You’re going to create construction lines to help guide us to place our pips. Press ‘L’ on the keyboard to create a line and then click X to turn the line into a construction line. Starting at the top left corner, create a construction line that is 5mm long. Make another construction starting at the end of the previous line downwards that’s 5mm long.

Use the video above to guide you through placing the rest of the construction lines.

Step 5
Now you’re going to add circles Create⇩ > Circle⇩ > Center Diameter Circle (or use Keyboard shortcut ‘C’)

Each ending point of the construction lines represents the center point of a new circle. Add a 7mm circle to those endpoints. Finish Sketch.

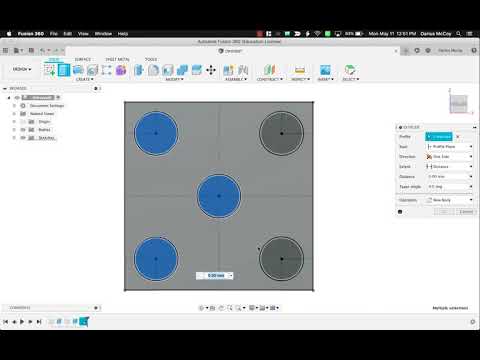
Step 6
Now you’re going to cut holes into the die using the circle sketches you just created. Create⇩ > Extrude (or use keyboard shortcut E) > Select all the circles > Distance: -1mm > Operation: Cut > Ok


Step 7
Now that you’ve created the six-sided face of the die, we challenge you to make the remaining faces of the die.
Video Timelapse

Timelapse