Tinkercad Tools: Hiding and Locking Objects
Objectives and Overview
This lesson introduces the hide and lock tools. These are helper utilities that you may not find yourself using often, but are extremely helpful when you need them. Both of these tools can be used as a quick toggle to prevent unintentional edits to objects or to hide some visual clutter.
Lesson Objectives
- Understand the benefits of hiding and locking objects in Tinkercad.
- Demonstrate the ability to hide and show objects in Tinkercad.
- Demonstrate the ability to lock objects in Tinkercad.
Hiding Objects
Tinkercad recently added the ability to hide objects from the workplane. This removes an object from the visibility on the workplane without deleting it. When an object is hidden you’re unable to interact with it. At first, this may not seem like a useful tool, but it’s actually very useful in certain cases.
Let’s look at an example. You have two objects that are rather close to each other on the workplane and you need to move one without impacting the other. In this example, let’s suppose you want to do some involved editing on the cylinder but since it’s so close to the other rectangles you find that the interface is cluttered and you make unintended changes to the other shapes.
This is when the hide tool is useful — you can hide the shapes you don’t want to edit. This will remove them from the viewport and allow you to edit the intended shape only.
Hiding Objects in Tinkercad
To hide an object, first select it on the workplane:

Once you’ve selected the object, click the lightbulb icon in the Shape panel. The shortcut for this is Cmd + H on Mac and Ctrl + H on Windows. This icon won’t be available unless you have a shape selected.

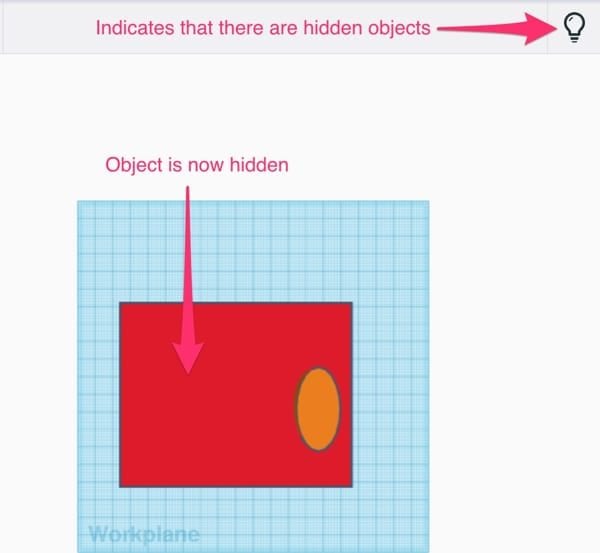
Once you hide the shape it disappears from the viewport on the workplane. Once the object is hidden you can’t interact with it. This prevents any accidental movement and removes some visual clutter from the workplane.
Once you hide the shape you’ll see that the lightbulb icon is now active on the main toolbar. This indicates that there are hidden shapes on the workplane.
Click this lightbulb to show all of the hidden shapes. The shortcut to show hidden shapes is Cmd + Shift + H on Mac and Ctrl + Shift + H on Windows.
Hiding objects is a good helper utility to keep in your toolbox as you’re working on more involved designs in Tinkercad. While you likely won’t be using this that often, it comes in handy when you do need to make some precise edits without bumping into other objects.
Locking Objects
Another helper utility in the newest version of Tinkercad is the lock tool. Locking an object makes it unable to move or be edited. Locking has a similar use case as hiding with the main difference being that a locked object remains visible. If you try to edit a locked object you’ll be unable to move it or change any dimensions. This is useful when you want to make sure that shape dimensions don’t accidentally get changed. Additionally, you can use this tool to ensure that you don’t unintentionally nudge a shape.
This is especially important when you’re working on a design that needs to be precise. A small, accidental shift can result in a printed object not working as intended, especially if it’s designed for a specific purpose.
Let’s look at how to lock objects.
Locking Objects in Tinkercad
In this example, there are three cylinders that are set within a red rectangle. These cylinders are grouped, aligned, and positioned where we want. Let’s suppose that this positioning is precise and is exactly where it should be. Let’s lock the grouped cylinders to prevent any unintentional shifts.

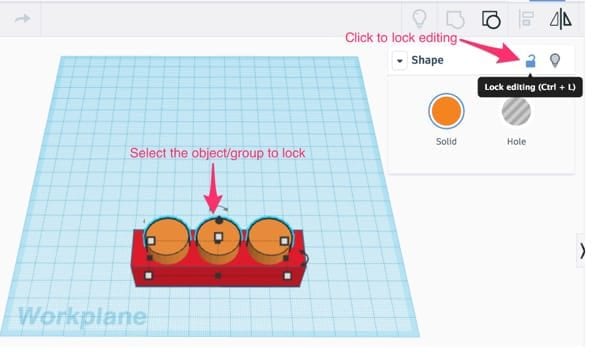
To lock an object, first select it on the workplane. This can be a single object or a group of objects. In this example, let’s select the grouped cylinders:

Once the object is selected, click the lock icon in the Shape panel. The shortcut for this is Cmd + L on Mac and Ctrl + L on Windows. Once locked you’ll be unable to move or edit the object.
Tinkercad includes a visual indicator for locked objects. Notice that there is now a purple outline on the locked object:

If you need to edit a locked object you need to unlock it first. To unlock an object, select it and then click the lock icon.
Locking objects is another helper utility to be aware of. This is a good tool to quickly toggle on and off, especially if you’re at risk for accidentally editing an object.